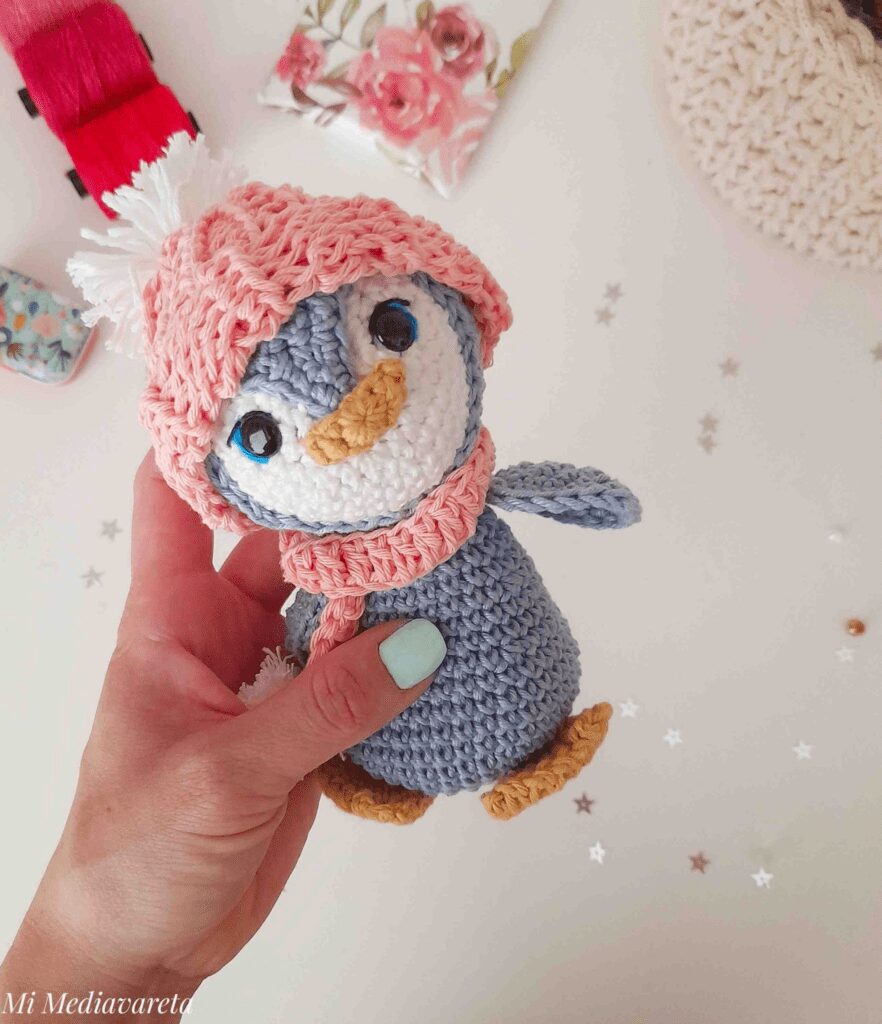
Step-by-Step Penguin Amigurumi

Pattern by: yohana villalba
Design + Inspiration
I was looking for gift ideas for special occasions like Christmas, Three Kings' Day, birthdays, or just because. You don’t need a big event to give a gift, right?
While brainstorming, I came up with this crochet penguin amigurumi named Pipo.
Yarn
To crochet this penguin amigurumi, I used Amigurumi Cotton. This yarn is ideal for creating small three-dimensional dolls.
It’s made of 100% mercerized cotton, has medium thickness, and offers high yield with a delicate finish.
If you can’t find this exact yarn, you can substitute it with 8/6 cotton yarn.
Materials
- 6-strand cotton yarn in grayish blue, white, corn yellow, and light salmon.
- 3 mm crochet hook.
- Silicone fiberfill.
- Safety eyes (size 10).
- Yarn needle.
- Scissors.
Abbreviations
- R.: ROUND
- MR: Magic Ring
- SC: Single Crochet
- SL ST: Slip Stitch
- HDC: Half Double Crochet
- DC: Double Crochet
- CH: Chain
- INC: Increase
- DEC: Decrease
Pattern
Let’s begin with this crochet penguin..
Head (in white yarn)
Start with a magic ring.
- R1: 6 SC.
- R2: 1 INC in each stitch. (12)
- R3: 1 SC, 1 INC. Repeat. (18)
- R4: 2 SC, 1 INC. Repeat. (24)
- R5: 3 SC, 1 INC. Repeat. (30)
- R6: 4 SC, 1 INC. Repeat. (36)
- R7–R12: 36 SC.
- R13: 4 SC, 1 DEC. Repeat. (30)
With the circle facing forward, place the eyes between ROUND 4 and 5.
- R14: 3 SC, 1 DEC. Repeat. (24)
- R15: 2 SC, 1 DEC. Repeat. (18)
- R16: 1 SC, 1 DEC. Repeat. (12)
Stuff with fiberfill.
- R17: 6 DEC.
Close and cut the yarn.

Penguin Head Cap (grayish blue)
Make a magic ring to begin the helmet.
- R1: 8 SC.
- R2: 1 INC in each stitch. (16)
- R3: 1 SC, 1 INC. Repeat. (24)
- R4: 2 SC, 1 INC. Repeat. (32)
- R5: 3 SC, 1 INC. Repeat. (40)
- R6–R11: 40 SC.
Chain 1 and turn.
- R12: 8 SC.
- R13: 1 CH, 1 DEC, 4 SC, 1 DEC.
- R14: 1 CH, 6 SC.
- R15: 1 CH, 1 DEC, 2 SC, 1 DEC.
- R16: 2 DEC.
- R17: 2 SC.
- R18: 1 DEC.
Chain 1 and single crochet around the entire edge.
Close and cut the yarn, leaving a tail for sewing.
Beak (corn yellow)
Make a magic ring.
- R1: 6 SC.
- R2: 1 INC in each stitch. (12)
- R3: 12 SC.
Close and sew onto the face.
Body (oval shape, increases on the sides)
- R1: MR of 6 SC.
- R2: 1 INC in each stitch. (12)
- R3: 3 SC, 3 INC, 3 SC, 3 INC. (18)
- R4: 3 SC, (1 SC, 1 INC) x3, 3 SC, (1 SC, 1 INC) x3. (24)
- R5: 3 SC, (2 SC, 1 INC) x3, 3 SC, (2 SC, 1 INC) x3. (30)
- R6: 3 SC, (3 SC, 1 INC) x3, 3 SC, (3 SC, 1 INC) x3. (36)
- R7–R11: 36 SC.
- R12: 3 SC, (3 SC, 1 DEC) x3, 3 SC, (3 SC, 1 DEC) x3. (30)
- R13–R14: 30 SC.
- R15: 3 SC, (2 SC, 1 DEC) x3, 3 SC, (2 SC, 1 DEC) x3. (24)
- R16–R17: 24 SC.
- R18: 3 SC, (1 SC, 1 DEC) x3, 3 SC, (1 SC, 1 DEC) x3. (18)
- R19–R20: 18 SC.
Close, cut the yarn, and leave a long tail for sewing. Stuff with fiberfill.
Wings (make 2, grayish blue)
- R1: MR of 6 SC.
- R2: 1 INC in each stitch. (12)
- R3: 1 SC, 1 INC, 1 SC, 1 INC, 1 HDC, 1 INC, 1 HDC, 1 INC, 1 SC, 1 INC, 1 SC, 1 INC. (18)
- R4: 7 SC, 1 HDC, 1 INC, 1 INC, 1 HDC, 7 SC. (20)
Close and leave yarn for sewing.
Feet (x2, corn yellow)
- R1–R2: 5 SC.
- R3: 1 INC in each stitch. (10)
- R4: 10 SC.
- R5: (1 SC, 1 INC) x5. (15)
- R6–R7: 15 SC.
To shape the toes: Chain 2, slip stitch, repeat to the end. Close and leave yarn for sewing.
Tail (grayish blue)
- R1–R2: 5 SC.
- R3: 1 INC in each stitch. (10)
- R4: 10 SC.
- R5: 2 SC, 5 INC, 3 SC. (15)
- R6: 2 SC, (1 SC, 1 INC) x5, 3 SC. (20)
Close, leave yarn for sewing, and stuff lightly.
Scarf (light salmon)
- Chain 45.
- Row 1: Chain 3, 45 DC.
Close. Make two mini white pom-poms and attach to the ends.
Hat (light salmon)
- Chain 15.
- Row 1: Chain 2, 15 HDC.
- Row 2: Chain 2, 15 HDC in front loops only.
- Row 3: Chain 2, 15 HDC in back loops only.
Repeat Rows 2–3 until reaching Row 14.
Close, sew, and add a white pom-pom.
Finishing
Sew the body to the head, attach wings, feet, and tail.
Add the hat and scarf—your Penguin Pipo is complete!
Show me your penguin by tagging me on social media with #mimediavareta!
If you’d like to explore more articles like Step-by-Step Penguin Amigurumi, feel free to visit the Amigurumis section.


You might also like