

🪐 FREE Tutorial: How to Crochet a BB-8 Star Wars Amigurumi 🧶

Are you a Star Wars fan who loves amigurumi? This tutorial is for you! 🎉 Today, I’ll guide you step-by-step in creating your very own BB-8 crochet droid—the adorable galactic companion. Perfect for beginners and experts alike, and best of all: it’s completely free! 🌟
By the end, you’ll have a crocheted BB-8 that’ll be the envy of your friends and a stellar addition to your Star Wars collection. 🚀✨
This pattern was designed by Ahook Amigurumi, a crochet expert who shares her talent with the community. If you love this tutorial, don’t forget to follow her on social media and visit her shop for more amazing patterns:
- Facebook: Ahook Amigurumi
- Website: Ahook Amigurumi
- Etsy Shop: Ahookashop
Let’s get started! 🧶✨
Table
Abbreviations
- st: Stitch(es)
- slst: Slip stitch
- sc: Single crochet
- MR: Magic ring
- rep: Repeat instructions from previous ROUND
- inc: Increase (2 sc in next st)
- dec: Decrease (invisible or sc2tog)
- BLO: Back loop only
- FO: Fasten off
- inv.FO: Invisible finish (see page 4)
- sp.st: Spike stitch (see page 3)
- *(...,...)x: Repeat instructions in parentheses "x" times
General Instructions
- Work in continuous ROUNDs (do not join or turn unless specified).
- Mark the last stitch of each ROUND with a stitch marker to ensure correct stitch count.
- Increases/decreases are staggered to avoid visible seams.
- If printing, mark completed ROUNDs (○) to track progress.
Materials
- Sport-weight yarn (Phildar Phil Coton 3 or similar):
- Gray
- White/off-white
- Orange
- 2.5 mm crochet hook (US C/2)
- Yarn needle
- Stitch markers
- Polyester stuffing
- Safety eyes: 6 mm and 9 mm (adjust size if changing yarn/hook).
Skill Level
Intermediate: Requires knowledge of sc, slst, MR, increases, decreases, BLO, and sewing pieces together.
Approximate size: 9 cm (3.5 inches) tall.
Special Stitch: Spike Stitch (sp.st)
A sp.st is an elongated single crochet: Insert hook into a stitch one row below your current work (Pic.1), then complete as a normal sc (Pic.2-3).


Surface Slip Stitch
- Insert hook where you want the stitch to begin (Pic.1), yarn over.
- Pull through; you’ll have one loop on the hook (Pic.2).
- Insert hook between the next 2 stitches and slst (Pic.3).
- Continue until desired length (Pic.4-5).
- Weave in ends to prevent unraveling.


Invisible Color Change
- Inv.FO: Cut yarn, thread through yarn needle (Pic.1).
- Skip one st, insert needle into next st from front to back (Pic.2).
- Insert needle into the back loop of the original exit st (Pic.3).
- Gently pull to match stitch tension (Pic.4).
- For new color: Make a slip knot with new yarn (Pic.5), insert hook into any st, and sc (Pic.6-7).


Head
With white yarn:
- ROUND 1: 8 sc in MR {8}.
- Invisible color change to gray.
- ROUND 2: 8 inc {16}.
- Invisible color change to white.
- ROUND 3: (sc, inc) x8 {24}.
- ROUND 4: sc, inc, (sc 2, inc) x7, sc {32}.
- Do not FO yet. Turn work.
- Add 21 surface slst between ROUNDs 3-4, leaving a 3-st white gap (Pic.3).
- Inv.FO and switch to gray.
- ROUNDs 5-9: rep 32 sc {32}.
- Attach safety eyes:
- 9 mm eye between ROUNDs 4-5 (below slst gap).
- 6 mm eye between ROUNDs 6-7 (2 sts apart).
- Add 25 surface slst from bottom-right of small eye (Pic.*).
- Switch to white in BLO of any st in ROUND 9.
- ROUND 10: BLO – (sc 2, dec) x8 {24}.
- ROUND 11: (sc, dec) x8 {16}.
- For fixed head: FO, leave long tail to sew.
- For movable head: Continue below.


Movable Head
- ROUND 12: 8 dec {8}.
- FO, stuff, and insert a 9 mm safety eye upside down (Pic.).
- Thread yarn through front loops of remaining sts, pull tight to close.
- Set aside and continue with Body until ROUND 14.
- Attach head’s eye to body (next to orange circle edge) and secure with washer.


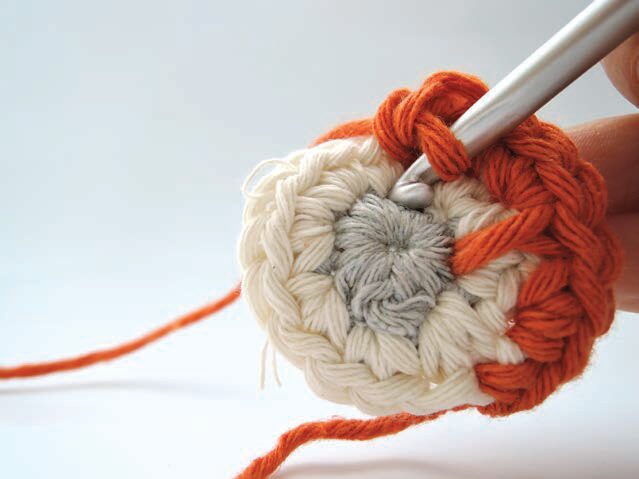
Circles (Make 6)
With gray yarn:
- ROUND 1: 8 sc in MR {8}.
- Inv.FO, switch to white.
- ROUND 2: 8 inc {16}.
- Inv.FO, switch to orange.
- ROUND 3: sc, inc, sp.st, (inc, sc, inc, sp.st) x3, inc {24}.
- Skip the st behind each sp.st.
- Inv.FO, switch to white in first st of any inc (Pic.3).
- ROUND 4: (sc 2, inc) x8 {32}.
- FO, leave long tail to sew (except for the 6th circle—do not FO).


Body
- ROUND 5: (sc 3, inc) x8 {40}.
- ROUNDs 6-14: 40 sc each.
- ROUND 15: (sc 3, dec) x8 {32}.
- ROUND 16: sc, dec, (sc 2, dec) x7, sc {24}.
- Stuff firmly.
- ROUND 17: (sc, dec) x8 {16}.
- ROUND 18: 8 dec {8}.
- FO, weave yarn through front loops to close.
Assembly
- Pin the remaining 5 circles to the body:
- One opposite the attached circle.
- Four evenly spaced between them.
- Align sp.st patterns.
- Sew circles in place.
- For fixed head, stuff and attach now.


Congratulations! 🎉 Your crocheted BB-8 is ready to join the Resistance! Share your creation on social media and tag @AhookAmigurumi—she’d love to see your work.
May the crochet force be with you! 🌌✨

If you’d like to explore more articles like 🪐 FREE Tutorial: How to Crochet a BB-8 Star Wars Amigurumi 🧶, feel free to visit the Amigurumis section.
How to Crochet an Adorable Easter Chick Amigurumi 🧶🐤 with Its Shell and Little Eggs – FREE Step-by-Step Tutorial

🐉💚 How to Crochet a Cute Little Amigurumi Dragon – FREE Step-by-Step Tutorial

🐍✨ How to Crochet an Adorable Bow-Wearing Amigurumi Snake – FREE Step-by-Step Tutorial

✨ How to Crochet an Adorable Gingerbread Man Christmas Cookie 🍪🧶 – FREE Step-by-Step Tutorial

🦇 Free Step-by-Step Amigurumi Bat Crochet Tutorial

How to Crochet a Labubu Amigurumi
Suscribirse
0 Comments
You might also like