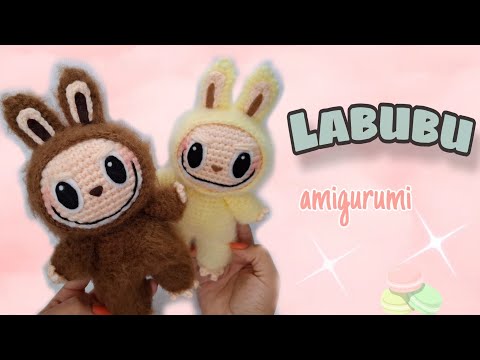
How to Crochet a Labubu Amigurumi

Do you love crochet and want a new adorable project? 💖 This tutorial is for you! Today, we’re sharing a step-by-step video to create your own Labubu amigurumi—a cute and playful character that’s super popular among crafters! 🦊🧶
This 100% free Spanish tutorial was created by the talented artist behind Espacio Skellingcute, who patiently guides you through every stitch—perfect for beginners!
🔔 YouTube: Subscribe here
📸 Instagram: Follow here
📘 Facebook: Like here
MATERIALS NEEDED
- Yarn: Acrylic in:
- Main color (e.g., pastel yellow for body)
- Skin tone for head, hands, and feet
- Optional: Other colors for details
- 3.5 mm crochet hook
- Yarn needle
- Polyfill stuffing
- Metal bristle brush (for furry effect)
- Felt (white, black, brown for eyes/nose/details)
- Fabric glue or cold silicone
- Scissors
- Stitch marker
PATTERN INSTRUCTIONS
FEET (Make 2)
Rnd 1: 6 sc in magic ring. Join with sl st. [6]
Rnd 2: Inc in each st. [12]
Rnd 3: (1 sc, inc) x6. [18]
Rnd 4: 1 sc in back loops only. [18]
Rnd 5-6: 1 sc in each st. [18]
Rnd 7: (5 sc, inc) x3. [21]
Rnd 8-9: 1 sc in each st. [21]
Finish: Cut yarn, leave tail to sew. Make 2nd foot but don’t cut yarn—use it to attach to body.
BODY
- Join both feet with 21 sc each (42 total).
Rnd 2-6: 1 sc in each st. [42]
Rnd 7: (4 sc, invdec) x7. [35]
Rnd 8: 1 sc in each st. [35]
Rnd 9: (3 sc, invdec) x7. [28]
Rnd 10-11: 1 sc in each st. [28]
Rnd 12: (2 sc, invdec) x7. [21]
Rnd 13: 1 sc in each st. Join with sl st, leave long tail to attach head. [21]
HEAD (Skin tone)
Rnd 1: 6 sc in magic ring. [6]
Rnd 2: Inc x6. [12]
Rnd 3: (1 sc, inc) x6. [18]
Rnd 4: (2 sc, inc) x6. [24]
Rnd 5: (3 sc, inc) x6. [30]
Rnd 6: (4 sc, inc) x6. [36]
Rnd 7: (5 sc, inc) x6. [42]
Rnd 8: (6 sc, inc) x6. [48]
Rnd 9-15: 1 sc in each st. [48]
Decrease:
Rnd 16: (6 sc, invdec) x6. [42]
Rnd 17: (5 sc, invdec) x6. [36]
Rnd 18: (4 sc, invdec) x6. [30]
Rnd 19: (3 sc, invdec) x6. [24]
Rnd 20: (2 sc, invdec) x6. [18]
Rnd 21: (1 sc, invdec) x6. [12]
Rnd 22: Invdec x6. Close with sl st, leave tail to sew.
HAT (Main color)
Rnd 1: 6 sc in magic ring. [6]
Rnd 2: Inc x6. [12]
Rnd 3: (1 sc, inc) x6. [18]
Rnd 4: (2 sc, inc) x6. [24]
Rnd 5: (3 sc, inc) x6. [30]
Rnd 6: (4 sc, inc) x6. [36]
Rnd 7: (5 sc, inc) x6. [42]
Rnd 8: (6 sc, inc) x6. [48]
Rnd 9: (7 sc, inc) x6. [54]
Rnd 10-13: 1 sc in each st. [54]
Rnd 14: (7 sc, invdec) x6. [48]
Rnd 15-18: 1 sc in each st. [48]
Rnd 19: (6 sc, invdec) x6. Close with sl st, leave tail to attach.
Brush main color yarn for fuzzy texture.
ARMS (Make 2, main color)
Rnd 1: 6 sc in magic ring. [6]
Rnd 2: Inc x6. [12]
Rnd 3: 1 sc in back loops only. [12]
Rnd 4: (1 sc, inc) x6. [18]
Rnd 5-6: 1 sc in each st. [18]
Rnd 7: (1 sc, invdec) x6. [12]
Rnd 8-9: 1 sc in each st. [12]
Rnd 10: Invdec x6. Close with sl st, leave tail to sew.
HANDS (Make 2, skin tone)
- Ch 3, then:
1 sc in each ch (3 sc). Join with sl st. Repeat to make 3 "fingers." Leave tail to attach to arms.
LEGS (Make 2, skin tone)
Rnd 1: 6 sc in magic ring. [6]
Rnd 2: Inc x6. [12]
Finish: Make 3 "fingers" like hands. Sew to feet.
EARS (Make 2, main color)
Rnd 1: 6 sc in magic ring. [6]
Rnd 2: 1 sc in each st. [6]
Rnd 3: Inc x6. [12]
Rnd 4-9: 1 sc in each st. [12]
Close with sl st, leave tail to sew.
Inner Ear (Make 2):
- Ch 5.
- 1 sc in 2nd ch from hook and next 3 ch. [4 sc]
- In last ch: 3 sc (to round tip).
- 1 sc in each of next 3 ch + 1 extra sc. [4 sc]
- Join with sl st, leave tail to sew.
DETAILS
- Eyes: Glue white felt (diagonal oval) + black felt (smaller oval). Add white stitch for shine.
- Nose: Brown felt triangle.
- Mouth: Black yarn "U" shape.
- Teeth: Tiny white felt triangles.
- Eyelids: Skin-tone yarn over eyes.
- Blush: Pink shading on cheeks.
FINISHING
- Brush entire body/ears with metal brush for fur effect.
- Sew all parts. Secure with glue if needed.
Video Tutorial:
Credit: This FREE tutorial was created by Espacio Skellingcute. Support her by subscribing/following:
🔔 YouTube: Subscribe here
📸 Instagram: Follow here
📘 Facebook: Like here
Happy crocheting! 🧸💛
If you’d like to explore more articles like How to Crochet a Labubu Amigurumi, feel free to visit the Amigurumis section.


You might also like