

🐉💚 How to Crochet a Cute Little Amigurumi Dragon – FREE Step-by-Step Tutorial

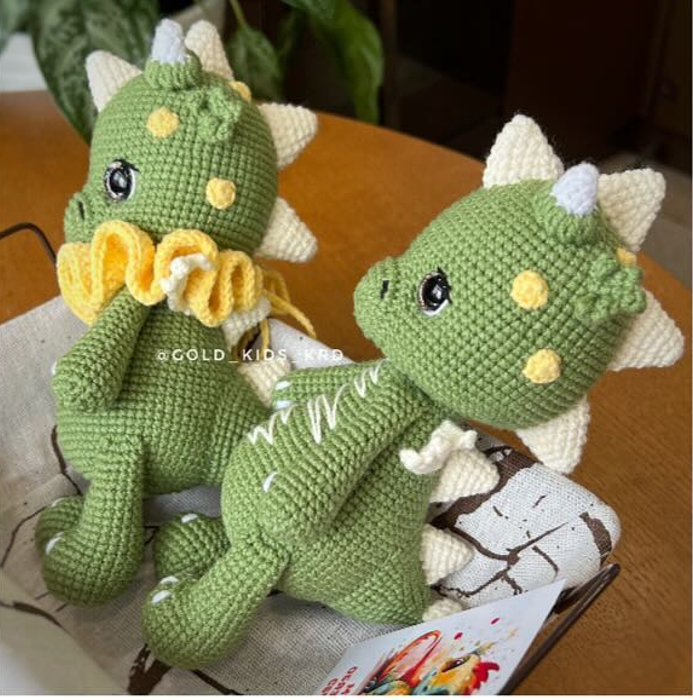
Hello, crocheters! 🌈🧵 In this FREE Spanish-language tutorial, you’ll learn to create an adorable little amigurumi dragon 🐉💚. With its soft body and charming details, this mini dragon is perfect for gifting, decorating, or simply adding cuteness to your amigurumi collection.
This original design is by Espacio Lydia Demina, a crochet artist who generously shares her patterns so you can enjoy crafting as much as she does.
This tutorial is ideal if you have basic amigurumi skills and a desire to create something magical ✨. So grab your yarn, hook, and imagination—let’s get started!
MATERIALS NEEDED:
- Yarn: Alize Cotton Gold (or preferred brand)
- Stuffing (fiberfill)
- Hook: Size 2 (2.0 mm)
- 12 or 14 mm safety eyes
- Sewing needle and thread
- Scissors
PATTERN INSTRUCTIONS:
HEAD
- Round 1: 8 sc in magic ring.
- Round 2: 8 inc (16 st).
- Round 3: (1 sc, 1 inc) x8 (24 st).
- Round 4: (2 sc, 1 inc) x8 (32 st).
- Round 5: (7 sc, 1 inc) x4 (36 st).
- Round 6: (5 sc, 1 inc) x6 (42 st).
- Round 7: (6 sc, 1 inc) x6 (48 st).
- Round 8: (11 sc, 1 inc) x4 (52 st).
- Round 9: (12 sc, 1 inc) x4 (56 st).
- Round 10: 56 sc.
- Round 11: (13 sc, 1 inc) x4 (60 st).
- Rounds 12-13: 60 sc (2 rounds).
- Round 14: (14 sc, 1 inc) x4 (64 st).
- Rounds 15-17: 64 sc (3 rounds).
- Round 18: 15 sc, 1 inc, 31 sc, 1 inc, 16 sc (66 st).
- Rounds 19-20: 66 sc (2 rounds).
- Round 21 (eye holes): 25 sc, 1 ch, skip 1 st, 14 sc, 1 ch, skip 1 st, 25 sc (66 st).
- Rounds 22-27: 66 sc (6 rounds).
- Round 28: (20 sc, 1 dec) x3 (63 st).
- Round 29: (19 sc, 1 dec) x3 (60 st).
- Insert eyes in the holes from Round 21.
- Round 30: (13 sc, 1 dec) x4 (56 st).
- Round 31: (5 sc, 1 dec) x8 (48 st).
- Round 32: (4 sc, 1 dec) x8 (40 st).
- Round 33: (3 sc, 1 dec) x8 (32 st).
- Stuff head firmly.
- Round 34: (2 sc, 1 dec) x8 (24 st).
- Round 35: (1 sc, 1 dec) x8 (16 st).
- Round 36: 8 dec. Fasten off, weave in tail.
SNOUT
- Round 1: 8 sc in magic ring.
- Round 2: 1 sc, 2 inc (3 st each), 2 sc, 2 inc (3 st each), 1 sc (16 st).
- Round 3: 3 sc, 3 inc, 4 sc, 3 inc, 3 sc (22 st).
- Round 4: (2 sc, 1 inc) x3, 4 sc, (1 inc, 2 sc) x3 (28 st).
- Round 5: 5 sc, 1 inc, 2 sc, 1 inc, 10 sc, 1 inc, 2 sc, 1 inc, 5 sc (32 st).
- Round 6: 32 sl st. Leave tail for sewing.
BODY
- Round 1: 7 sc in magic ring.
- Round 2: 7 inc (14 st).
- Round 3: (1 sc, 1 inc) x7 (21 st).
- Round 4: (2 sc, 1 inc) x7 (28 st).
- Round 5: (3 sc, 1 inc) x7 (35 st).
- Round 6: (4 sc, 1 inc) x7 (42 st).
- Round 7: (6 sc, 1 inc) x6 (48 st).
- Round 8: (7 sc, 1 inc) x6 (54 st).
- Round 9: (8 sc, 1 inc) x6 (60 st).
- Round 10: (14 sc, 1 inc) x4 (64 st).
- Round 11: 64 sc.
- Round 12: 15 sc, 5 sc joined with leg, 24 sc, 5 sc joined with leg, 15 sc (64 st).
- Rounds 13-16: 64 sc (4 rounds).
- Round 17: 19 sc, 1 dec, (6 sc, 1 dec) x3, 19 sc (60 st).
- Rounds 18-19: 60 sc (2 rounds).
- Round 20: 19 sc, 1 dec, (8 sc, 1 dec) x2, 19 sc (57 st).
- Round 21: 57 sc.
- Round 22: 20 sc, 1 dec, (5 sc, 1 dec) x2, 21 sc (54 st).
- Round 23: (7 sc, 1 dec) x6 (48 st).
- Round 24: (6 sc, 1 dec) x6 (42 st).
- Round 25: (5 sc, 1 dec) x6 (36 st).
- Rounds 26-27: 36 sc (2 rounds).
- Round 28: (10 sc, 1 dec) x3 (33 st).
- Round 29: 33 sc.
- Round 30: (9 sc, 1 dec) x3 (30 st).
- Stuff body.
- Round 31: 6 sc, 5 sc joined with arm, 7 sc, 5 sc joined with arm, 7 sc.
- Round 32: 30 sc. Fasten off, leaving tail to attach head.
ARMS (Make 2)
- Round 1: 6 sc in magic ring.
- Round 2: 6 inc (12 st).
- Round 3: (1 sc, 1 inc) x6 (18 st).
- Rounds 4-6: 18 sc (3 rounds).
- Round 7: (7 sc, 1 dec) x2 (16 st).
- Round 8: 16 sc.
- Round 9: 3 sc, 1 dec, 6 sc, 1 dec, 3 sc (14 st).
- Rounds 10-11: 14 sc (2 rounds).
- Round 12: (5 sc, 1 dec) x2 (12 st).
- Rounds 13-14: 12 sc (2 rounds).
- Round 15: 2 sc, 1 dec, 4 sc, 1 dec, 2 sc (10 st).
- Rounds 16-22: 10 sc (7 rounds). Fasten off.
LEGS (Make 2)
- Round 1: 7 sc in magic ring.
- Round 2: 7 inc (14 st).
- Round 3: (1 sc, 1 inc) x7 (21 st).
- Round 4: (2 sc, 1 inc) x7 (28 st).
- Rounds 5-9: 28 sc (5 rounds).
- Round 10: 7 sc, 1 dec, 1 sc, 4 dec, 1 sc, 1 dec, 7 sc (22 st).
- Round 11: 8 sc, 2 dec (worked together), 8 sc (18 st).
- Rounds 12-13: 18 sc (2 rounds).
- Round 14: 4 sc, 1 dec, 6 sc, 1 dec, 4 sc (16 st).
- Rounds 15-16: 16 sc (2 rounds).
- Round 17: 3 sc, (1 dec, 2 sc) x2, 1 dec, 3 sc (13 st).
- Rounds 18-20: 13 sc (3 rounds).
- Round 21: (3 sc, 1 dec) x2, 3 sc (11 st).
- Fasten off.
TAIL
- Round 1: 6 sc in magic ring.
- Round 2: (1 sc, 1 inc) x3 (9 st).
- Round 3: (2 sc, 1 inc) x3 (12 st).
- Round 4: (3 sc, 1 inc) x3 (15 st).
- Round 5: (4 sc, 1 inc) x3 (18 st).
- Round 6: (5 sc, 1 inc) x3 (21 st).
- Round 7: (6 sc, 1 inc) x3 (24 st).
- Round 8: (5 sc, 1 inc) x4 (28 st).
- Round 9: 9 sc, 1 inc, 8 sc, 1 inc, 9 sc (30 st).
- Round 10: 12 sc, 1 inc, 4 sc, 1 inc, 12 sc (32 st).
- Round 11: 8 sc, 1 inc, (4 sc, 1 inc) x3, 8 sc (36 st).
- Round 12: 7 sc, 1 inc, 4 sc, 1 inc, 3 sc, 1 inc, 2 sc, 1 inc, 3 sc, 1 inc, 4 sc, 1 inc, 7 sc (42 st).
- Round 13: 40 sc, 2 sl st.
- Fasten off, leaving a tail for sewing.
DETAILS
EARS (Make 2)
Worked in rows:
- 4 ch, skip 1 ch, 3 sc in next 3 ch.
- 1 ch, 2 sc, 3 ch.
- Skip 1 ch, 4 sc in next 3 ch.
- 1 ch, 3 sc, 3 ch.
- Skip 1 ch, 5 sc in next 3 ch.
- 1 ch, 3 sc, 2 ch.
- Skip 1 ch, 4 sc in next 2 ch.
- 1 ch, 2 sc, 2 ch.
- Skip 1 ch, 3 sc in next 2 ch.
WINGS (Make 2)
- 12 ch, skip 1 ch, 11 sc in next 11 ch.
- 1 ch, 10 sc, 3 ch.
- Skip 1 ch, 12 sc in next 3 ch.
- 1 ch, 10 sc, 2 ch.
- Skip 1 ch, 11 sc in next 2 ch.
HORNS
- 6 sc in magic ring (white yarn).
- 5 sc, 1 inc (7 st).
- 2 sc, 1 inc, 4 sc (8 st).
- 1 inc, 7 sc (9 st).
- Switch to body color: In each st, work 2 hdc together.
- Fasten off and stuff lightly.
SPIKES
Small (Make 2):
- R1: 6 sc in magic ring.
- R2: 1 sc, 1 inc, 2 sc, 1 inc, 1 sc (8 st).
- R3: (3 sc, 1 inc) x2 (10 st).
- R4: 2 sc, 1 inc, 4 sc, 1 inc, 2 sc (12 st).
- R5: (5 sc, 1 inc) x2 (14 st).
- R6: 11 sc, 3 sl st.
Large (Make 4):
- R1-5: Same as small.
- R6: 3 sc, 1 inc, 6 sc, 1 inc, 3 sc (16 st).
- R7: 14 sc, 2 sl st.
SPOTS (Make 6)
- 7 sc in magic ring. Fasten off, leaving tail to sew.
TAIL BALL
- 7 sc in magic ring.
- 7 inc (14 st).
- R3-4: 14 sc (2 rounds).
- 7 dec. Stuff and close.
ASSEMBLY
- Snout: Sew between the eyes, stuff firmly, and embroider nostrils.
- Eyes: Create eye sockets and embroider eyelids/whites.
- Head Attachments:
- Sew 1 small spike on the forehead.
- Attach 3 large spikes (top of head and nape).
- Add horns, ears, and spots.
- Tail: Stuff and sew to the body, attaching the tail ball at the tip.
- Spikes: Sew 1 small spike on the tail and 1 large spike on the back.
- Wings: Sew onto the body.
- Final Touches:
- Join head to the body.
- Embroider zigzags on the chest and claws on feet/hands.
- Optional: Add a collar (see author’s "Dinosaur" pattern).
FINISHING NOTES
Your magical little dragon is now ready to charm everyone! ✨🐉 If you enjoyed this FREE pattern, consider supporting the designer by following Espacio Lydia Demina for more adorable creations.
Happy crocheting! 🧶💚

Congratulations! 🎉 You’ve finished your adorable handmade amigurumi dragon—isn’t it the cutest? 🐉💕
We hope you enjoyed this project as much as we did! Remember, this FREE pattern was shared with love by Espacio Lydia Demina, who creates endlessly sweet and unique designs.
📲 Support her work and stay tuned for more tutorials by following her on social media:
🔗 Instagram: @gold_kids_krd
🔗 VK: Gold Kids KRD
🧵✨ If you loved this tutorial, share it, leave a comment, and subscribe for more heartwarming projects. See you in the next amigurumi adventure! 💚
If you’d like to explore more articles like 🐉💚 How to Crochet a Cute Little Amigurumi Dragon – FREE Step-by-Step Tutorial, feel free to visit the Amigurumis section.
How to Crochet an Adorable Easter Chick Amigurumi 🧶🐤 with Its Shell and Little Eggs – FREE Step-by-Step Tutorial

🐍✨ How to Crochet an Adorable Bow-Wearing Amigurumi Snake – FREE Step-by-Step Tutorial

✨ How to Crochet an Adorable Gingerbread Man Christmas Cookie 🍪🧶 – FREE Step-by-Step Tutorial

🦇 Free Step-by-Step Amigurumi Bat Crochet Tutorial

How to Crochet a Labubu Amigurumi

How to Crochet an Ígor (Eeyore) Amigurumi – FREE Step-by-Step Tutorial
Suscribirse
0 Comments
You might also like