

🧶🚗✈️🚛 FREE Tutorial: How to Crochet a Tiny Car, Airplane, and Truck

If you love crochet and want to create adorable toys, this tutorial is perfect for you! Today, you’ll learn to crochet a Tiny Car, Airplane, and Truck 🚗✈️🚛. These projects are ideal for gifts, decor, or even selling. Plus, they’re easy to make and great for using up yarn scraps.
This tutorial was created by Yarnspirations, a leading brand in patterns and materials for crafters worldwide. Follow them for more inspiration! ⬇️
🌍 Yarnspirations.com
📹 YouTube
📸 Instagram
📘 Facebook
Skill Level: EASY
Materials Needed:
- Cotton yarn in:
- 319 Cherry Red (A)
- 324 Bright Yellow (B)
- 315 White (C)
- 313 Black (D)
- 400 Heather Gray (E)
- 505 Aruba Sea (F)
- 672 Spring Green (G)
- 254 Pumpkin (H)
- 886 Blue (I)
- 3.75mm crochet hook (US F-5)
- Yarn needle, fiberfill stuffing
- Scissors
Gauge: 15 sts = 10cm in pattern; 16 rows/rnds = 10cm in sc. Adjust hook size to match.
Special Stitches:
- sc3tog (single crochet 3 together): [Insert hook in next st, yarn over, pull up a loop] 3 times, yarn over, pull through all 4 loops.
- bpdc (back post double crochet): Insert hook behind the post of the stitch, work a dc. Skip the stitch in front of the bpdc.
- fpdc (front post double crochet): Insert hook in front of the post of the stitch, work a dc.
- sc2tog (single crochet 2 together): [Insert hook in next st, yarn over, pull up a loop] twice, yarn over, pull through all 3 loops.
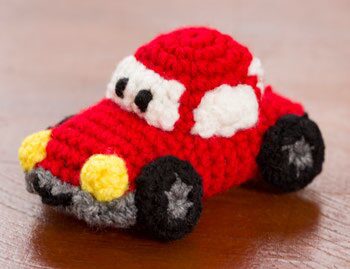
CAR
Body
Start at the front with A. Ch 8.
ROUND 1: 3 sc in the 2nd ch from hook, 1 sc in next 5 ch, 3 sc in last ch; work on the opposite side of the foundation ch, 1 sc in next 5 ch; join with sl st to first sc — 16 sc.
ROUND 2: Ch 1, 2 sc in first 3 sc, 1 sc in next 5 sc, 2 sc in next 3 sc, 1 sc in remaining sc; join with sl st — 22 sc.
ROUNDS 3–16: Ch 1, 1 sc in each sc around; join with sl st.
ROUND 17: Ch 1, 1 sc in first 3 sc, sc2tog 3 times, 1 sc in next 5 sc, sc2tog 3 times, 1 sc in last 2 sc; join with sl st — 16 sc.
ROUND 18: Ch 1, 1 sc in first 3 sc, sc3tog, 1 sc in next 5 sc, sc3tog, 1 sc in last 2 sc; join with sl st — 12 sc. Fasten off, leaving a long tail for sewing. Lightly stuff and close.
Roof
With A, ch 2.
ROUND 1: 6 sc in 2nd ch from hook; join with sl st — 6 sc.
ROUND 2: Ch 1, 2 sc in each sc around; join with sl st — 12 sc.
ROUND 3: Ch 1, [1 sc in next sc, 2 sc in next sc] 6 times; join with sl st — 18 sc.
ROUND 4: Ch 1, [1 sc in next 2 sc, 2 sc in next sc] 6 times; join with sl st — 24 sc.
ROUNDS 5–6: Ch 1, 1 sc in each sc around; join with sl st. Fasten off, leaving a tail. Sew to body (rounds 8–15).
Windows (Front/Back & Sides)
Front/Back Windows (make 2): With C, ch 7.
Row 1 (RS): 1 sc in 2nd ch and each ch — 6 sc. Fasten off, leave tail to sew. With D, embroider eyes on Row 1.
Side Windows (make 2): With C, ch 2.
Row 1 (RS): 3 sc in 2nd ch — 3 sc.
Row 2: 2 sc in each sc — 6 sc. Fasten off, leave tail.
Bumpers (make 2)
With E, ch 15.
Row 1 (RS): 1 sc in 2nd ch and each ch — 14 sc. Fasten off, leave tail.
Headlights (make 2)
With B, ch 2.
ROUND 1: 5 sc in 2nd ch; join with sl st — 5 sc. Fasten off, leave tail.
Wheel Halves (make 8)
With E, ch 2.
ROUND 1: 6 sc in 2nd ch; join with sl st; switch to D — 6 sc.
ROUND 2: Ch 1, 2 sc in each sc around; join with sl st — 12 sc. Fasten off, leave tail on 4 halves. Join two halves to form wheels.
Assembly
- Sew bumpers to front/back of the body, centered and slightly wrapped around the sides.
- With D, embroider a curved smile on the front bumper using backstitch.
- Attach headlights to the bumper ends.
- Sew wheels to the sides, letting them hang slightly below the body.
AIRPLANE
Nose & Body
Note: Stuff every few rounds.
With F, ch 2 (starting at the nose).
ROUND 1: 6 sc in 2nd ch from hook; join with sl st — 6 sc.
ROUND 2: Ch 1, 2 sc in each sc around; join with sl st — 12 sc.
ROUND 3: Ch 1, 1 sc in each sc around; join with sl st.
ROUND 4: Ch 1, [1 sc in next sc, 2 sc in next sc] 6 times; join with sl st — 18 sc.
ROUNDS 5–6: Repeat ROUND 3. Switch to G at the end of ROUND 6.
ROUND 7: Ch 1, [1 sc in next 2 sc, 2 sc in next sc] 6 times; join with sl st — 24 sc.
ROUND 8: Ch 1, [1 sc in next 3 sc, 2 sc in next sc] 6 times; join with sl st — 30 sc.
ROUND 9: Repeat ROUND 3.
ROUND 10: Ch 1, [1 sc in next 3 sc, sc2tog] 6 times — 24 sc.
ROUNDS 11–19: Repeat ROUND 3 (9 times).
ROUND 20: Ch 1, [1 sc in next 2 sc, sc2tog] 6 times — 18 sc.
ROUNDS 21–26: Repeat ROUND 3 (6 times).
ROUND 27: Ch 1, [1 sc in next sc, sc2tog] 6 times — 12 sc.
ROUNDS 28–31: Repeat ROUND 3 (4 times).
ROUND 32: Ch 1, sc2tog around; join with sl st — 6 sc.
ROUND 33: Repeat ROUND 3. Fasten off, leave tail. Weave tail through last round to close.
Detail: With D, embroider a curved smile between ROUNDS 3–4 on the nose.
Front Wings (make 2)
With H, ch 8 (starting at the wing tip).
Row 1 (RS): 1 sc in 2nd ch and each ch — 7 sc. Turn.
Row 2: Ch 1, 1 sc in each sc. Turn.
Row 3: Ch 1, 1 sc in first 3 sc, 3 sc in next sc, 1 sc in remaining sc — 9 sc. Turn.
Row 4: Repeat Row 2.
Row 5: Ch 1, 1 sc to center of the 3-sc group, 3 sc in center sc, 1 sc in remaining sc — 11 sc. Turn.
Rows 6–13: Repeat Rows 4–5 (4 times) — 19 sc.
Row 14: Repeat Row 2. Fasten off, leave tail. Fold wing lengthwise and sew edges.
Rear Wings (make 3)
With H, ch 6.
Row 1 (RS): 1 sc in 2nd ch and each ch — 5 sc. Turn.
Row 2: Ch 1, 1 sc in each sc. Turn.
Row 3: Ch 1, 1 sc in first 2 sc, 3 sc in next sc, 1 sc in remaining sc — 7 sc. Turn.
Row 4: Repeat Row 2.
Row 5: Ch 1, 1 sc in first 3 sc, 3 sc in next sc, 1 sc in remaining sc — 9 sc. Turn.
Row 6: Repeat Row 2. Fasten off, leave tail. Fold and sew edges.
Windshield
With C, ch 7.
Row 1 (RS): 1 sc in 2nd ch and each ch — 6 sc. Turn.
Row 2: Ch 1, 2 sc in each sc — 12 sc. Fasten off, leave tail.
Detail: With D, embroider eyes on Row 1 (1 sc apart). Sew to ROUNDS 7–8 of the body.
Wheels
- Front wheel halves (make 4): Follow the same method as the car wheels (6 sc in ring, increase to 12 sc). Join two halves per wheel.
- Rear wheel (make 2 halves): With D, 6 sc in ring. Join halves.
Assembly
- Sew front wings to sides (ROUNDS 14–20).
- Sew 2 rear wings to sides (ROUNDS 30–33) and 1 wing on top.
- Attach front wheels slightly ahead of wings; center the rear wheel.

TRUCK
CAB
With I (Blue), ch 3.
Row 1 (RS): 1 dc in 4th ch from hook (starting ch-3 counts as first dc), 1 dc in each ch across — 32 dc. Turn.
Row 2: Ch 3 (counts as dc), 1 dc in next 3 dc, [1 bpdc around next dc, 1 dc in next 7 dc] 3 times, 1 bpdc around next dc, 1 dc in last 3 dc — 32 dc. Turn.
Row 3: Ch 3, 1 dc in first 2 dc, [1 bpdc around next dc, 1 dc in next 7 dc] 3 times, 1 bpdc around next dc, 1 dc in last 4 dc. Turn.
Rows 4–5: Repeat Rows 2–3.
Row 6: Repeat Row 2. Fasten off, leave long tail for sewing.
ROOF & FLOOR OF CAB (make 2)
With I, ch 2.
ROUND 1: 8 sc in 2nd ch from hook; join with sl st — 8 sc.
ROUND 2: Ch 1, (1 sc, ch 2, 1 sc) in first sc, 1 sc in next sc, repeat from * 3 times; join with sl st — 12 sc + 4 ch-2 sp.
ROUND 3: Ch 1, 1 sc in first sc, (1 sc, ch 2, 1 sc) in next ch-2 sp, 1 sc in next 3 sc, repeat twice, (1 sc, ch 2, 1 sc) in last sp, 1 sc in last 2 sc — 20 sc + 4 sp.
ROUND 4: Ch 1, 1 sc in first 2 sc, (1 sc, ch 2, 1 sc) in next sp, 1 sc in next 5 sc, repeat twice, (1 sc, ch 2, 1 sc) in last sp, 1 sc in last 3 sc — 28 sc + 4 sp. Fasten off, leave tail.
FRONT BUMPER
With E (Heather Gray), ch 15.
Row 1 (RS): 1 sc in 2nd ch and each ch — 14 sc. Fasten off, leave tail.
GRILLE
With E, ch 5.
Row 1 (RS): 1 sc in 2nd ch and each ch — 4 sc. Turn.
Rows 2–3: Ch 1, 1 sc in each sc. Turn. Fasten off, leave tail.
HEADLIGHTS (make 2)
With B (Bright Yellow), ch 2.
ROUND 1: 6 sc in 2nd ch; join with sl st — 6 sc. Fasten off, leave tail.
WINDSHIELD
With C (White), ch 7.
Row 1 (RS): 1 sc in 2nd ch and each ch — 6 sc. Turn.
Row 2: Ch 1, 1 sc in each sc. Fasten off, leave tail.
Detail: With D (Black), embroider eyes on Row 1 (1 sc apart).
SIDE WINDOWS (make 2)
With C, ch 5.
Row 1 (RS): 1 sc in 2nd ch and each ch — 4 sc. Turn.
Row 2: Ch 1, 1 sc in each sc. Fasten off, leave tail.
TRAILER
Top/Bottom (make 2):
With E, ch 19.
Row 1 (RS): 1 sc in 2nd ch and each ch — 18 sc. Turn.
Rows 2–8: Ch 1, 1 sc in each sc. Turn. Fasten off, leave tail.
Sides (make 2):
With E, ch 19.
Row 1 (RS): 1 sc in 2nd ch and each ch — 18 sc. Turn.
Row 2: Ch 1, 1 sc in each sc; switch to B. Turn.
Rows 3–4: Ch 1, 1 sc in each sc; switch to A (Cherry Red). Turn.
Rows 5–6: Ch 1, 1 sc in each sc; switch to E. Turn.
Rows 7–8: Ch 1, 1 sc in each sc. Fasten off.
Rear Panel:
Same as Cab Roof (Round 4).
WHEELS (make 12 halves)
With E, ch 2.
ROUND 1: 6 sc in 2nd ch; join with sl st — 6 sc.
ROUND 2: Ch 1, 2 sc in each sc; switch to D — 12 sc.
ROUND 3: Ch 1, [1 sc in next sc, 2 sc in next sc] 6 times — 18 sc. Fasten off, leave tail on 6 halves.
Assembly: Join 2 halves to form 6 full wheels.
FINAL ASSEMBLY
- Cab:
- Fold the cab to form corners and sew edges.
- Attach roof and floor, stuffing before closing.
- Center bumper on front; embroider smile with D.
- Sew grille and headlights.
- Position windshield and side windows (align with Row 5 of cab).
- Trailer:
- Sew top/bottom pieces to sides.
- Attach rear panel and stuff.
- Connect trailer to cab.
- Wheels:
- Attach 2 wheels to cab and 4 to trailer (let halves hang slightly).

¡Felicidades! 🎉 Now you have a crocheted car, airplane, and truck set. These projects are perfect for playtime, gifts, or decor. Share your makes on social media and tag @yarnspirations!
Tip: Use safety eyes for a polished look. For more free patterns, visit Yarnspirations.com.

If you’d like to explore more articles like 🧶🚗✈️🚛 FREE Tutorial: How to Crochet a Tiny Car, Airplane, and Truck, feel free to visit the Amigurumis section.
How to Crochet an Adorable Easter Chick Amigurumi 🧶🐤 with Its Shell and Little Eggs – FREE Step-by-Step Tutorial

🐉💚 How to Crochet a Cute Little Amigurumi Dragon – FREE Step-by-Step Tutorial

🐍✨ How to Crochet an Adorable Bow-Wearing Amigurumi Snake – FREE Step-by-Step Tutorial

✨ How to Crochet an Adorable Gingerbread Man Christmas Cookie 🍪🧶 – FREE Step-by-Step Tutorial

🦇 Free Step-by-Step Amigurumi Bat Crochet Tutorial

How to Crochet a Labubu Amigurumi
Suscribirse
0 Comments
You might also like